Interaction and Activity in a Blackboard Ultra site
Interactivity in Blackboard Ultra
Discussion page
Discussions are one way to engage students in activity in a Blackboard site. They broaden communication and foster strong connection among the group and help with the development of a learning community
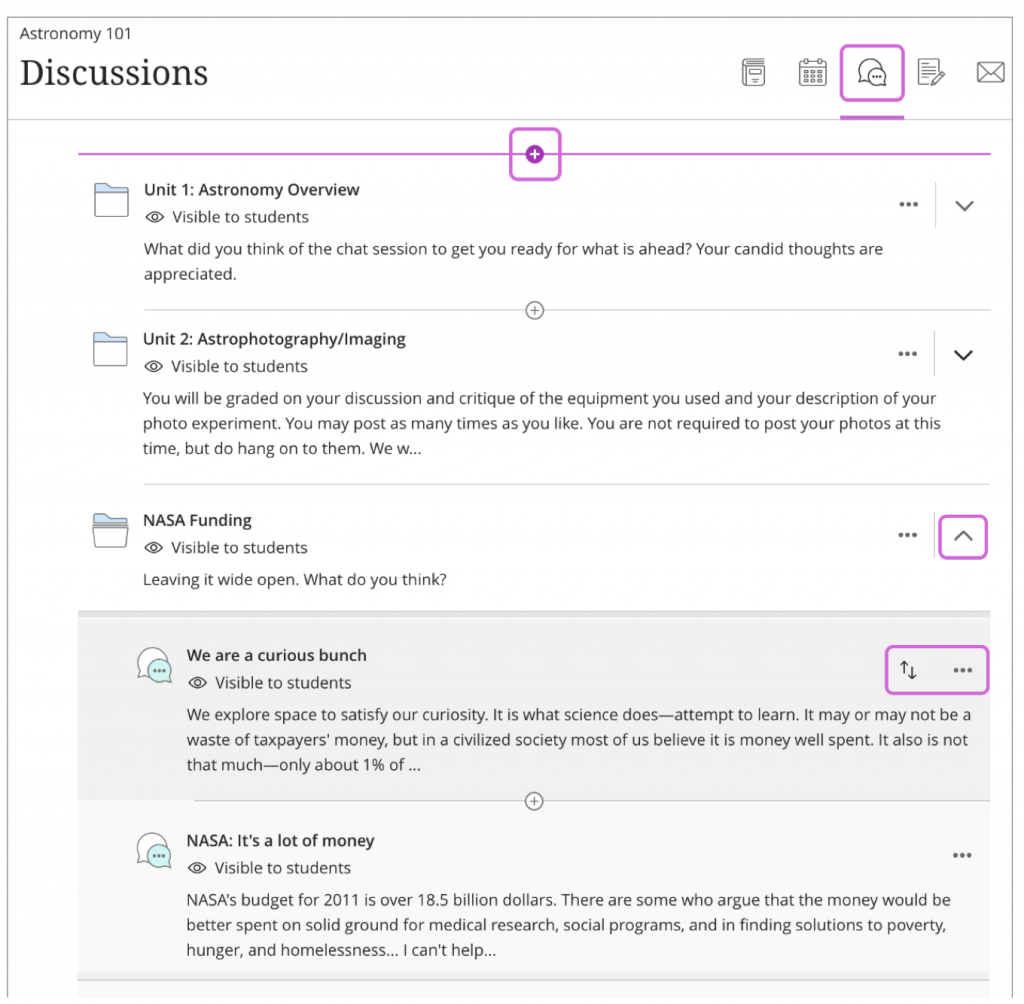
Fig. 27 Adding a discussion to course content
Create opportunities for interaction right where you need them
On your course content, just select the purple “+” sign or the Discussion icon from the Navigation Bar to add a discussion
Use the activity stream to your advantage
Review students contributions and respond directly from the activity stream. Or, you can jump to the full course discussion from the activity stream
You own discussion
Not ready to share a new discussion? Hide it. Want to make it simpler? Create folders to organise discussions. You can also rearrange the order or delete an entire discussion or specific response. New discussions are hidden from students by default. When you are ready to start, make your discussions visible to get your students talking!
Discussions or Conversations?
While you can use class discussion to develop or share ideas, you can use conversations for quick exchanges on specific content. For example, when you create assignments, you can enable conversations. Anyone can make a contribution to the assignment conversation – ask for help, share sources, or answer questions others have. Everyone can read the conversations while they view the assignment.
*FIY* Conversations appear only with the relevant content item and don’t appear on the discussion page
Create a discussion
On the Course Content page, select the purple “+” sign wherever you want to add a discussion. Select create > Participation and Engagement > Discussion.
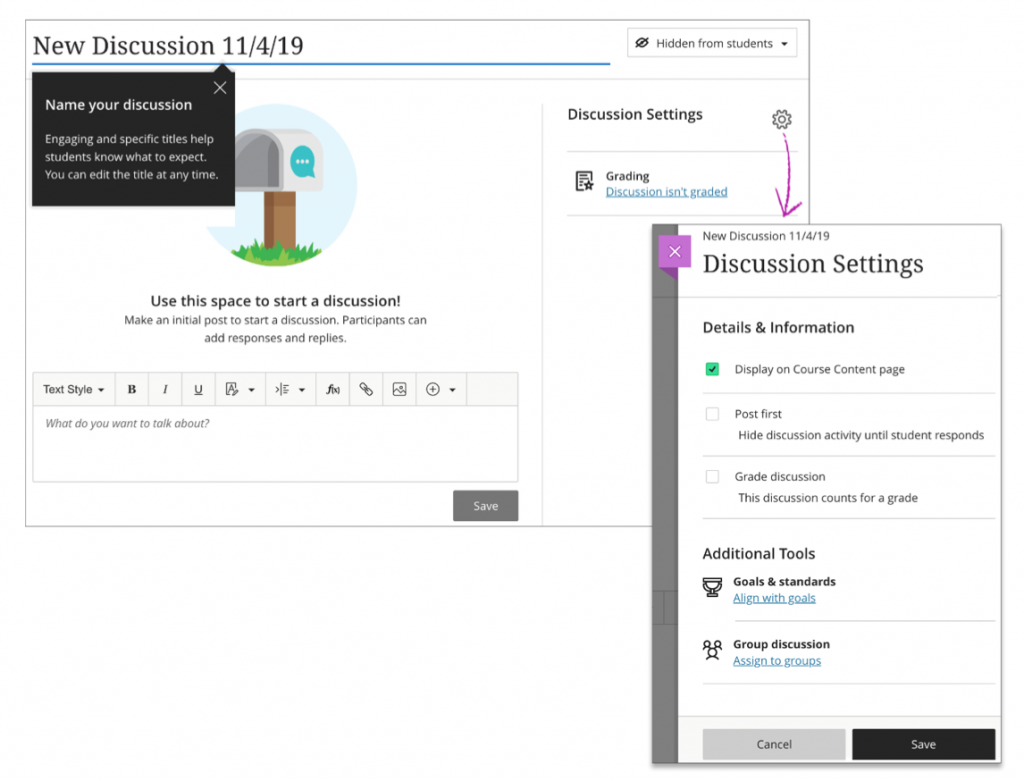
Fig. 28. Creating a Discussion
Type a meaningful title to help students find the right discussion in the content list. If you don’t add a title, “New Discussion” and the date appear on the main discussion page.
Make an initial post to start the discussion. Include guidelines and expectations to get students off to a good start. You can use the options in the editor to format your text.
*Quick Tip* To use your keyboard to jump to the editor toolbar, press ALT+F10. On a Mac, press Fn+ALT+F10. Use the arrow keys to select an option, such a numbered list.
You can show or hide the discussion from your students. You can edit this option at any time. New discussions are hidden by default.
Select the Edit Discussion Settings icon to open the settings panel. Select the options that work best for your discussion.
Bring your discussion to the surface. Select the Display on the Course Content page check box to include the discussion alongside other content items on the Course Content page
Grade the discussion. To motivate students to post insightful contributions, you can make the discussion count for a grade.
Assign a rubric. After you select Graded discussion, you can choose to create or add an existing rubric. You may associate only one rubric to each discussion.
Require students to post first. Discussions can be a great way to get a conversation going, but some students may rely too much on the thoughts of others when drafting a response. To encourage critical and original thinking, you can require students to post a response before they can view activity in a discussion. Hidden responses and replies can help students cultivate their own ideas on your initial discussion topic. Select Post First to hide discussion activity from students until they respond to the discussion. When you want to use both post first and discussion groups, select Post First before you assign groups.
Task: create a discussion
With the information above, create a discussion
Course groups
You can use course group sets and apply them to graded content, such as group assignments, test and discussions.
At this time, though students can access course groups, they can’t view the membership on the Group page. You can send out a starter message to each group and the members can then view their groups’ membership and send messages. You are included in the group messages.
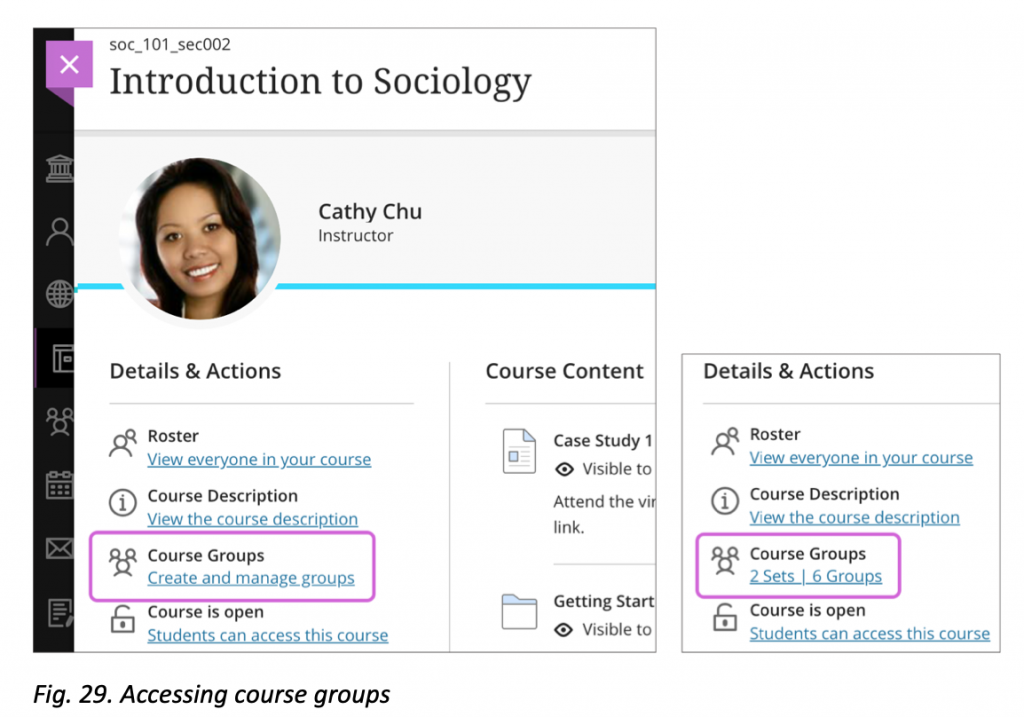
Accessing course groups
In the Details & Actions section under Course Groups, select Create and manage groups (fig. 29). If you’ve already set up course groups, the menu shows the number of sets and groups.
Create course groups
With a group set, you can create multiple groups around a theme, such as volunteering. Or, just create course groups you can use later when you create group assignments and discussions. You can pair students based on certain attributes, situations or tasks.
When you create course groups for the first time or want to add a new group set, a partial list of your students appears on the New Group Set page in the Unassigned student’s section. Select Show All to view the entire list.
Optionally, provide a descriptive title for the group set. If you don’t add a title, New Group Set and the date appear on the Course Groups page.
*FIY* You can create up to 99 groups in a group set
You can also select the purple “+” sign below the graphic to create a custom group and add students.
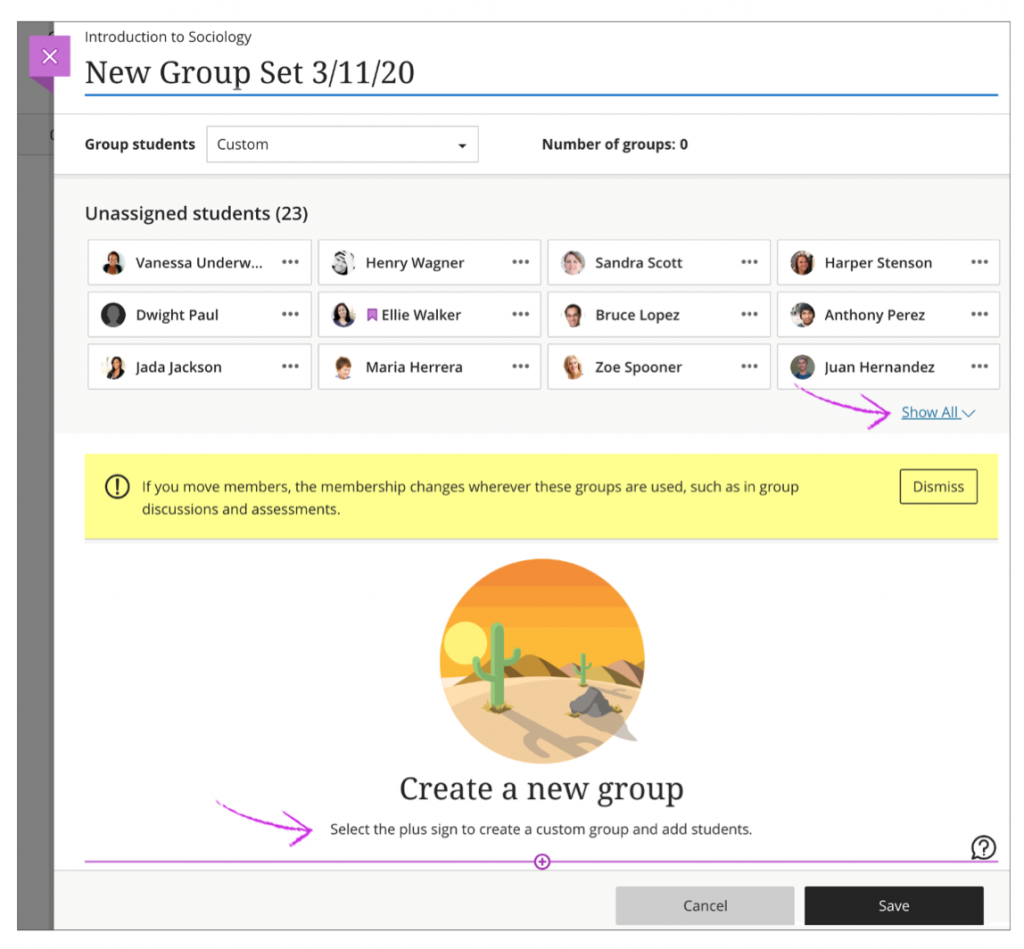
Fig. 30. Creating a new group
If you already have course groups, select New Group Set on the Course Group page.
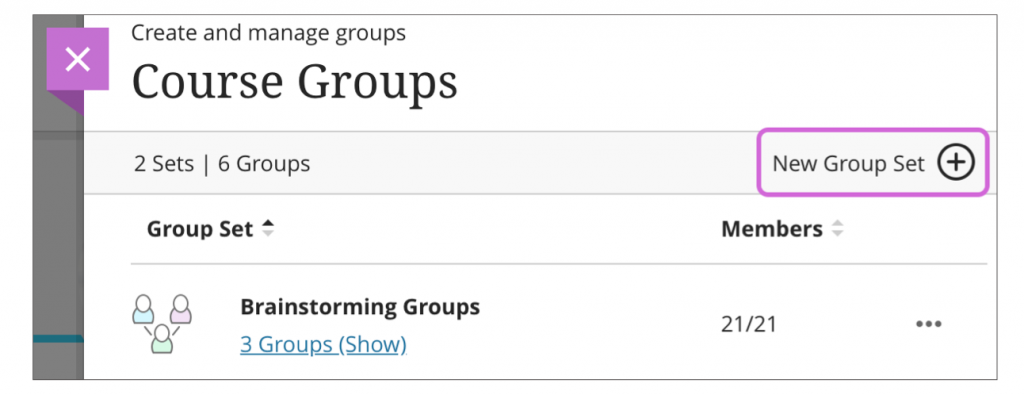
Fig. 31. Creating a new group set
You can divide your students among groups in these ways:
Custom
Randomly assign
Self-enrolment
Reuse groups
Custom groups
You can create a single, custom group or as many groups as you want, with any number of students in each group.
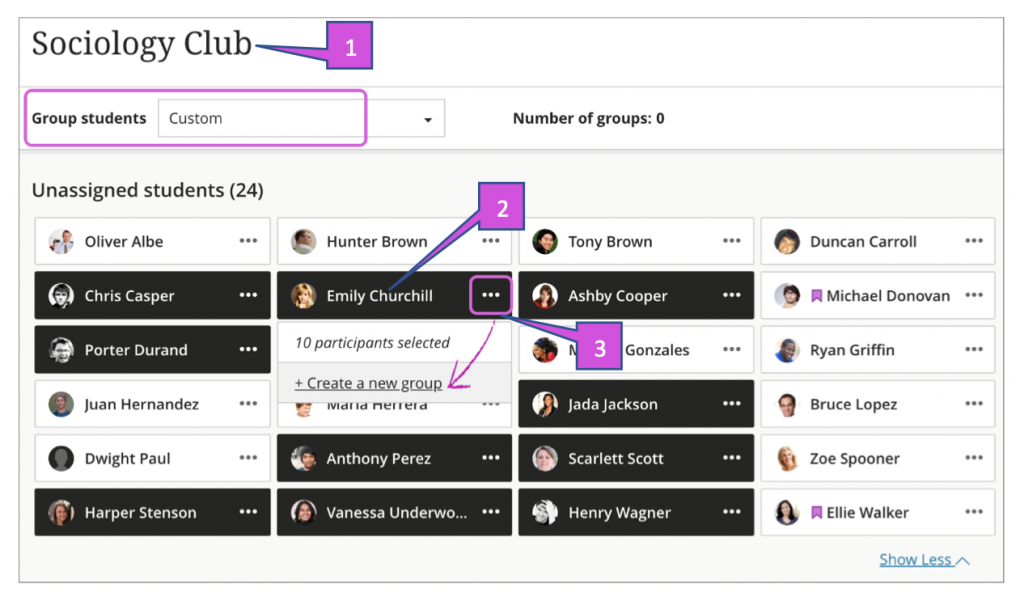
Fig. 32. Create a custom group set
In the group student’s menu, (fig. 32) select Custom and provide a name at the top of the page.
Select each student’s name to select them at the same time (fig. 32). Select a student’s name again to remove the selection.
After you select the students, open the menu next to one of their names and select Create a new group (fig. 32). You can also move multiple students to a group listed in the menu.
Edit the group name if you want to change the default naming (fig. 33).
Optionally, provide a group description (fig.33) that also appears to members of the group. You have no limit on the number of characters.
Select the plus sign wherever you want to add another group. You can also repeat step 2-5.
At this time, if you save a Custom group set, return to the group set, and select Custom again, your groups are deleted.

Fig. 33. New custom group creation
Randomly assign
Students are randomly assigned to the number of groups you choose
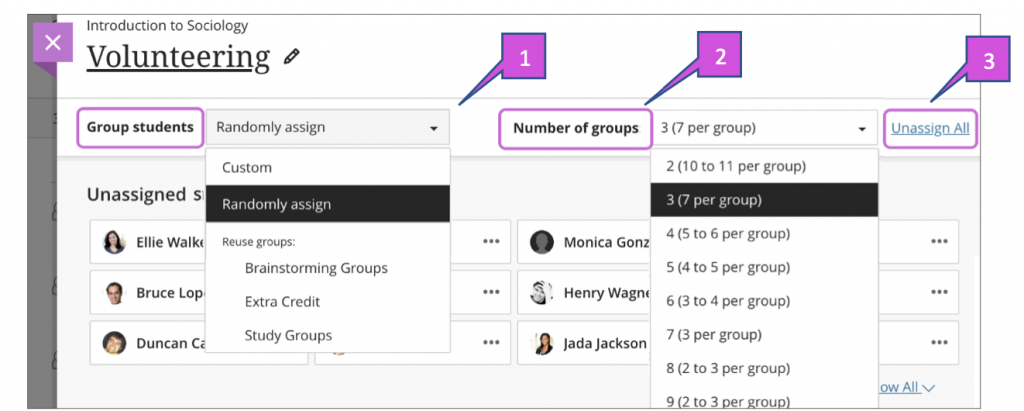
In the group student’s menu, select Randomly Assign and provide a name at the top of the page.
In the Number of group menu, select how many groups to create. Students are equally assigned to the number of groups you choose.
To remove all students from the current group set, select Unassign All at the top of the page. The setting changes to Custom if you move students to different groups after they’re grouped and before you save.
Reminder: you can create up to 99 groups in a group set.
Edit each group name if you want to change the default naming as shown previously (fig. 33)
Optionally, provide group descriptions as shown previously (fig. 33) that are shown to group members. You have no limit on the number of characters.
Select the plus sign wherever you want to create a group in addition to the groups the system created.
Self-enrolment
You can ask students to self-enrol in course groups. Only students may join. Students receive a course announcement and an activity stream notification about groups they need to join.
Students see Join a group and New in the Details & Actions panel on the Course
Content page. You can also add an enrolment period. Students are notified when the enrolment deadline approaches. When the enrolment period ends, students can no longer join groups, and they’re enrolled automatically.
On the groups page, you can create as many course groups as you want, with any number of students in each group. You can also create new course groups or remove course groups.
A partial list of your students appears in the Unassigned student’s section. Select Show All to view the entire list.
Self-enrolment group option show in (fig. 35).
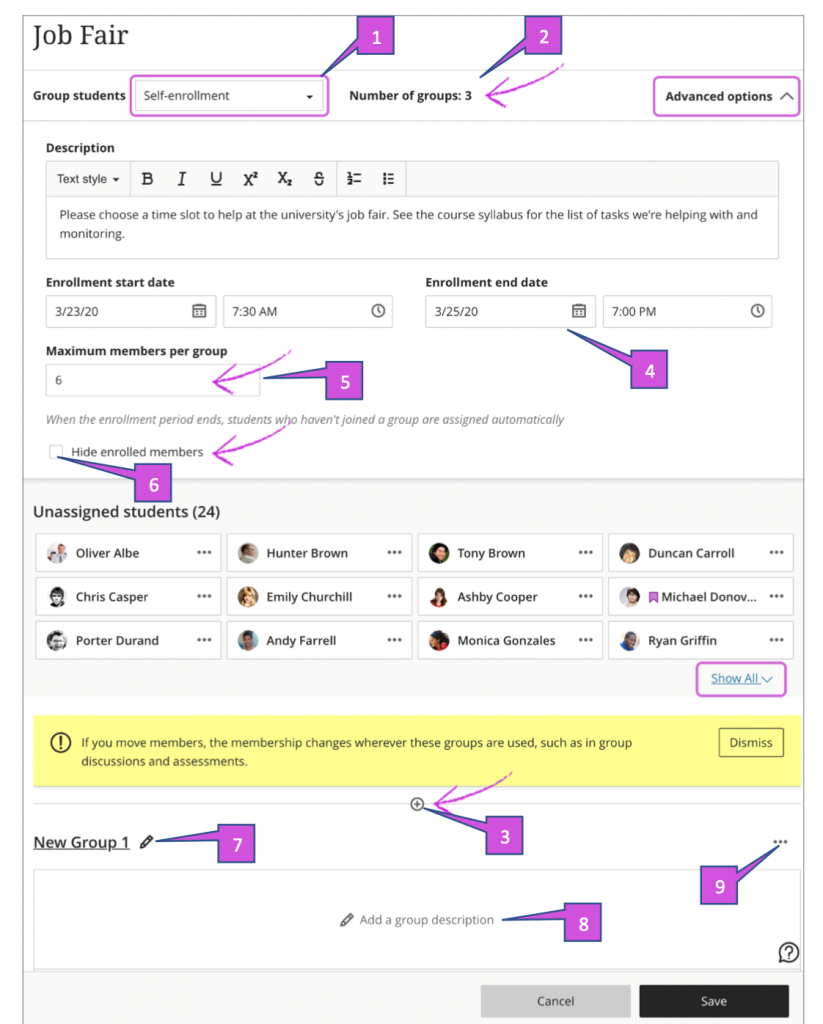
Fig. 35. Setting up self-enrolment group
In the Group student’s menu, select Self-enrolment (fig. 35).
Your students are evenly divided among the groups listed next to Number of groups (fig. 35). You need to create at least two self-enrolment course groups.
Select the plus sign (fig. 35) wherever you want to add another group. The Number of groups updates automatically. You can add and delete groups even after students have started to join. If you delete a group that students have already joined, they’re moved to the unassigned list. You’ll need to notify them to join one of the remaining groups or add them to a group.
Reminder: If you add an enrolment period, unassigned students are enrolled automatically when the period ends.
Optionally, add an enrolment start and end date (fig. 35). Select the arrow next to Advanced options to collapse the enrolment section.
Optionally, change or clear the Maximum number of members per group that appears by default (fig. 35). The optional maximum must be 2 or greater. If you added or deleted groups, the maximum number doesn’t update.
*Warning* Pay attention to the maximum members per group and the number of groups. For example, if you lower the maximum number, some students won’t be allowed to enrol in a group at the end of the enrolment period. You’ll need to create new groups and enrol the students.To allow unlimited members per group, leave blank. Students see the maximum number allowed when they make their group selections. If you allow an unlimited number per group, students see the total number of students in their class.You can override the maximum membership for a group. For example, you can add a newly enrolled student to a group.
Select the Hide enrolled members check box (fig. 35) if you don’t want students to see who’s already joined.
Edit each group name (fig. 35) if you want to change the default naming.
Add optional group descriptions (fig. 35). You can add information to help students choose a group. You have no limit on the number of characters.
Open the menu next to a group (fig. 35) to access the management options.
Learn about the student view of self-enrolling in course groups—use your browser’s back function to return to this topic.
Reuse groups
You can reuse an existing course group or group set.
*FYI* If you make changes to a group set you’ve re-used, those changes affect any group assignments and discussions based on that group set. Learn more about how group set changes affect the linked content items.
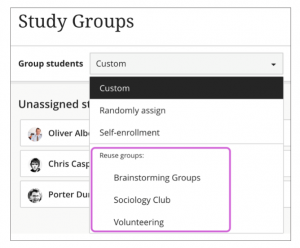
Fig. 36. Reusing a group
In the Group student’s menu, select a title from the Reuse groups section. Groups with no members also appear in the list.
Provide a name at the top of the page, edit the individual group names, and add optional group descriptions that are shown to group members. You have no limit on the number of characters.
The same students are added to your new group or group set. You may need to add new students added to your course to your new groups.
Watch a video about creating course groups
The following narrated video provides a visual and auditory representation of some of the information included on this page. For a detailed description of what is portrayed in the video, open the video on YouTube, navigate to More actions, and select Open transcript.
Video: Create course groups explains how to create course group sets in the Ultra Course view.
Task: Watch the video on how to create course groups
Please click and watch the video on how to create course groups
Manage individual groups
After you create a group, or a group set, you can add or delete individual groups, and manage student membership. You can also edit group names, add or edit group descriptions, and send messages to your groups to kick off collaboration!
Reminder: At this time, if you save a Custom group set, return to the group set, and select Custom again, your groups are deleted.
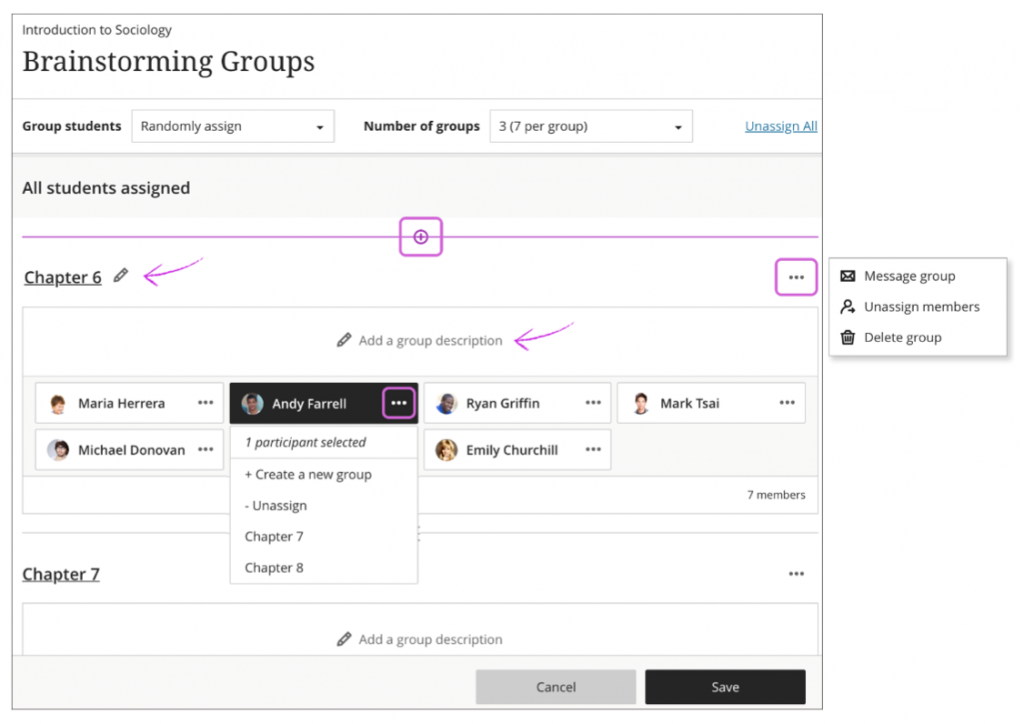
Fig. 37. Managing individual groups
Add and delete groups
Select the purple ‘+’ sign (fig 37) wherever you want to add a group.
If you no longer need a group, open the group’s menu and select Delete group (fig 37). The students in that group are unassigned automatically and appear at the top of the page. You can manually assign these students to new groups. Or, you can randomly assign all students—not only the students you unassigned—to the number of groups you choose.
Ramifications
If you add or delete a group in a group set used to create a new group set, the new group set is unaffected.
If you add or delete a group in a group set that you used to create a group assessment or discussion, that content item’s groups are updated. Edits to group titles and descriptions also affect the content items.
If you add or delete a group in a group assessment or discussion that’s based on a course group set, the course group set is updated. Edits to group titles and descriptions also affect the course group set.
If you delete a group set used to create a new group set, the new group set is unaffected.
If you delete an entire group set used to create a group assessment or discussion, the content item’s groups are removed.
If you delete a group assessment or discussion based on a course group set, the group set is unaffected.
Manage student membership
Open the menu next to a student’s name to access these options:
Start a new group with the student as a member.
Select Unassign to remove the student from the group. Unassigned students appear
at the top of the page.
Assign the student to a different group that already exists. Select the group’s name
in the menu. Groups with no members don’t appear.
You can also move multiple students to a different group in one action, create a new group for them, or unassign them all from the group.
To remove all students from all groups, select Unassign All at the top of the page.
Ramifications
Membership changes in a group set affect the content-level items where the groups are used, such as in group discussions and assessments.
Membership changes in a content-level item based on a course group set affect the course group set.
Membership changes in a group set do NOT affect other group sets that are based on the group set.
Course groups page
All groups you’ve created appear on the Course Groups page. Group sets with no members also appear. At the top of the page, the numbers of groups set and individual groups are listed.
You can also create a new group set.
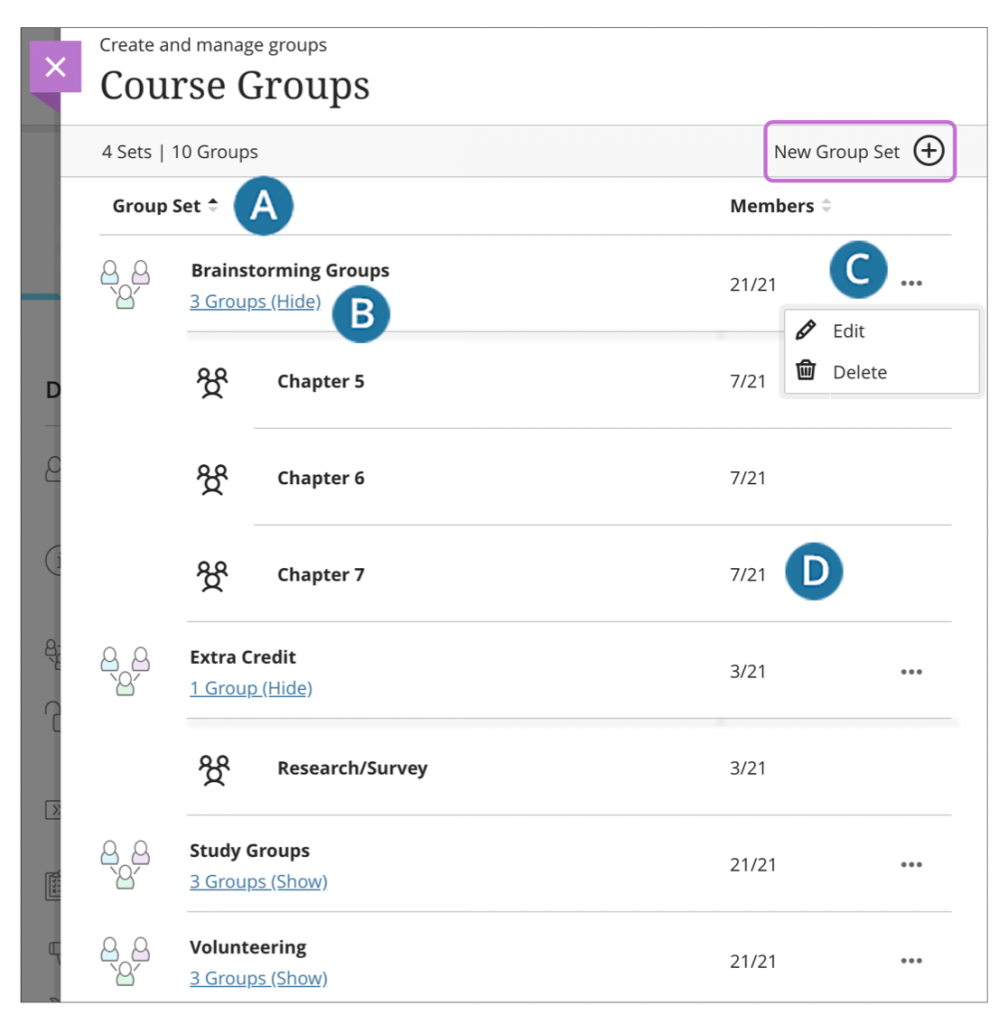
Fig. 38. Course group page.
Select a heading to sort your groups or the number of members in ascending or descending order.
Show or hide the groups in a group set.
Open a group set’s menu to edit or delete the group.
View the number of members in each group out of the total number of students in the course.
Course group and conversation
If you have course groups and group sets in your Original Course View and convert to the Ultra Course View, the group sets appear on the Course Groups page. Groups not part of a group set don’t appear on the Course Groups page. Also, self-enrol signup sheets don’t convert.