Communication
Communication in Blackboard Ultra
Announcements
Announcements help you share important information with others in your module. Announcements render differently in Blackboard Ultra than in the old version of Blackboard. Unlike messages, announcements (fig. 12) appear immediately when a student opens a module.
Students are less likely to ignore the information you share in an announcement because it demands attention. They need to dismiss the notification before they can view other content in the site.
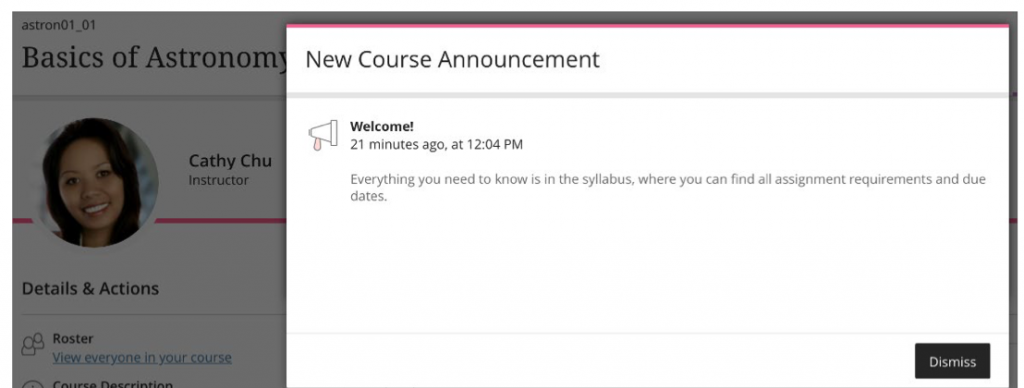
Fig. 12. New course announcement notification
Course announcement page
Find course announcements in the Details & Action pane.
The course announcement page lists all announcements in your Blackboard Ultra site, including each announcement’s status and number of viewers. You can create, copy, edit and delete announcements on this page.
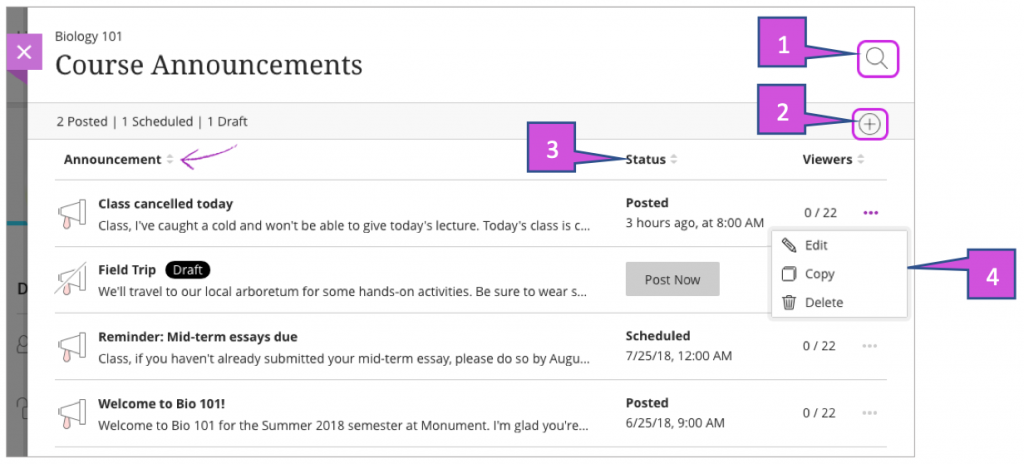
Fig. 13. Course Announcement
Search or sort the list (fig.13)
You can sort announcements by the title, status, or the number of viewers. You can use the search function to find announcements by title or message content.
Create a new announcement (fig.13)
You can create a blank announcement or copy an existing announcement to use as a template.
View the status (fig. 13)
Announcements have three states: Posted, Scheduled and Drafted. An announcement’s status appears with its content. You can also view the number of module announcements by status at the top of the page.
Manage announcements (fig. 13)
You can edit or delete announcements from this page
You can create an announcement for a future event, such as a reminder about a module event or exam. You can schedule announcements to post automatically in your module on the date and time you specify. You can also use the schedule feature to hide an announcement when it’s no longer relevant.
As you create an announcement, select Schedule announcement. Choose a date and time to start and stop the display of announcements to students.
*Quick Tip* Use the date picker for scheduling announcements. If you type a date, it reverts to the default date when you save the announcement.
Watch a video about creating announcements
Task: watch a video about creating announcements
Please click and watch the video on creating an announcement
The following narrated video provides a visual and auditory representation of some of the information included on this page. For a detailed description of what is portrayed in the video, open the video on YouTube, navigate the More actions, and select Open transcript.
Video: Create announcements show how to create an announcement in a Blackboard Ultra site
Create an announcement
Select Create announcement found on the Details and Action page to get started. The new Announcement page appears.
Type a title and message text for the announcement as shown (fig. 14). You can include up to 256 characters in the title. Select Save to save your announcement draft. Select Post in the Status column of the Course Announcement page to post the Announcement immediately.
You can also schedule announcements to start and end at certain times.
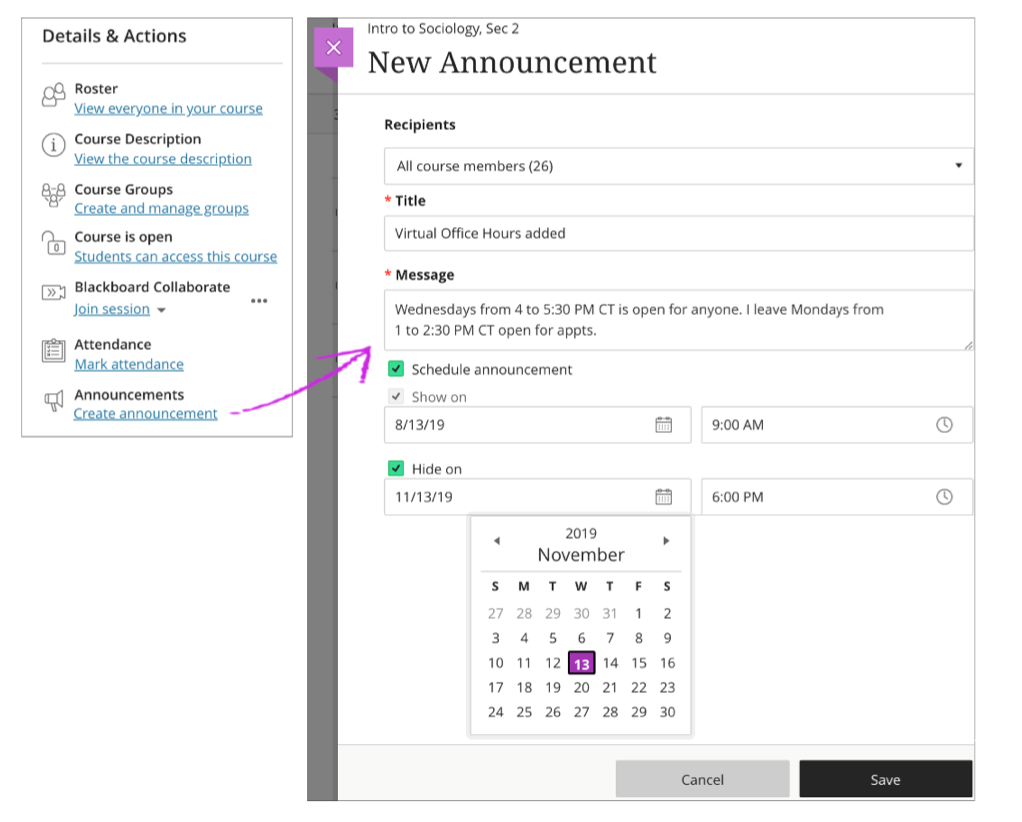
Fig. 14. Creating an announcement
After you have created and posted announcements in your course, the count of posted and total announcements updates on the Details and Actions pane (fig.15)
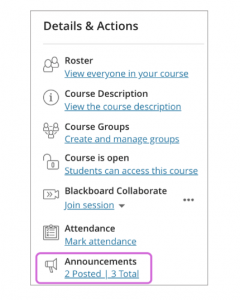
Fig. 15. Announcement posted and total count
Schedule an announcement
You can create an announcement for a future event, such as a reminder about a module event or exam. You can schedule announcements to post automatically in your module on the date and time you specify. You can also use the schedule feature to hide an announcement when it’s no longer relevant.
As you create an announcement. select Schedule announcement. Choose a date and time to start and stop the display of the announcement to students.
Task: create an announcement and add some text
View the information above, create an announcement and post it.
Edit or delete an announcement
You can edit any announcements in your module, including past, active and scheduled announcements. The following information can be found in the Course Announcement section found on the previous section.
select Edit to change an announcement’s title or message (fig.13). You can also edit the announcement’s schedule posting.
Select Delete to permanently remove the announcement from your module.
Select Copy to copy the announcement. You can create a template announcement and copy it for announcements that use a similar format.
Task: edit or delete the announcement
With the information above, edit or delete the announcement you have created.
Where announcement appear
Active module announcements appear the first time each time students enter the module after the announcement is posted. Announcement appear before the student can access the module Content page. After the student dismisses the announcement, it won’t appear immediately when the student accesses the module in the future.
Active announcements also appear in the Today and Recent sections of the activity stream. The Announcement disappears from the Activity stream when the student dismisses it within the module.
If an announcement is still alive, students can access the announcement they’ve dismissed. On the Module content page, students can select View archive to read past, active announcements in the module.
Message page
You may have noticed that with announcements no rich media can be added as in the old version of Blackboard. If you need to send rich media, you will need to send a message instead. If a message is sent, this is then delivered to in a module, access the Message page on the navigation bar. All your module messages and responses appear. You can easily scan the entire list and open a message to read all responses.
Any unread messages appear first in the list. Each message displays the profile picture of the author. Under the author’s name, you can view how many participants are included or if the message is for the whole class.
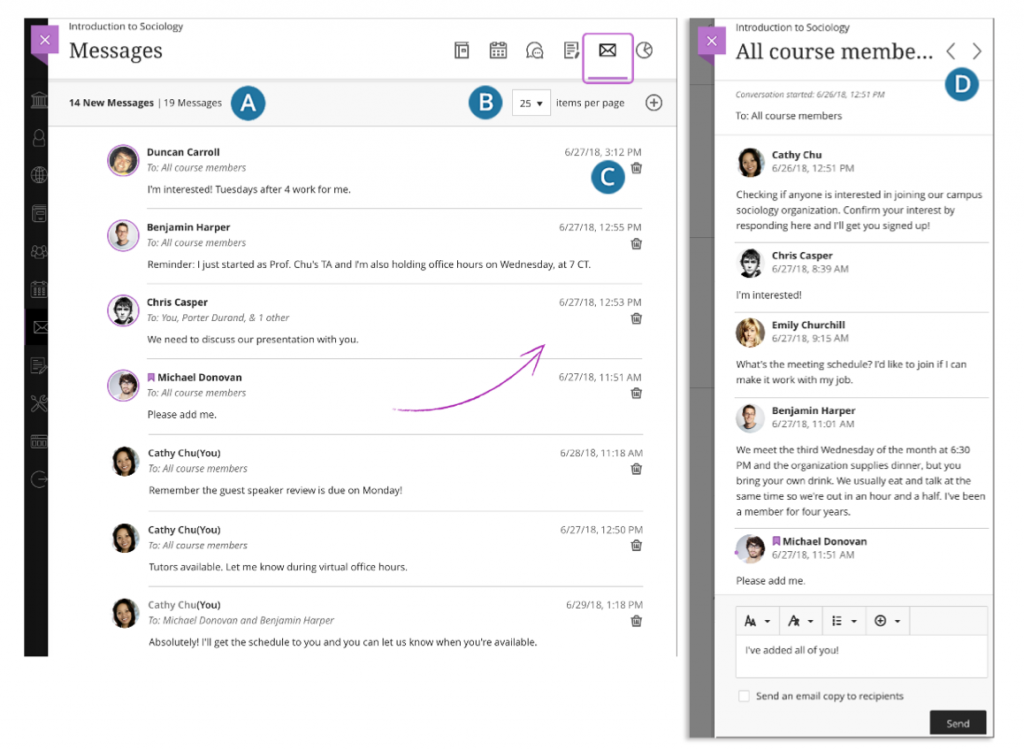
Fig. 16. Message page
A. Easily view what’s new
A count of messages appears above the list. New responses appear with a bold font.
B. Send a message
Select the New Message icon to send a message. Send to one person, multiple people or the entire class.
*Quick Tip* if you have any messages, select the number of messages you want to see per page to narrow your focus.
C. Delete a message
Use the Delete icon to delete a message. If more responses come in, you’ll get them. You can’t edit or delete individual responses in a message.
D. Navigate to another message
Messages open in a panel with all responses. Use the View Previous Messages and Next Message icon at the top to view the previous or next message in the list
When you create or respond to a message, select the add participants icon highlighted in Fig. 17 to add additional people unless the message was sent to the entire class. The original recipient see a note in the next message that you added new people or the whole class. The new recipients see the message from the point they were added.
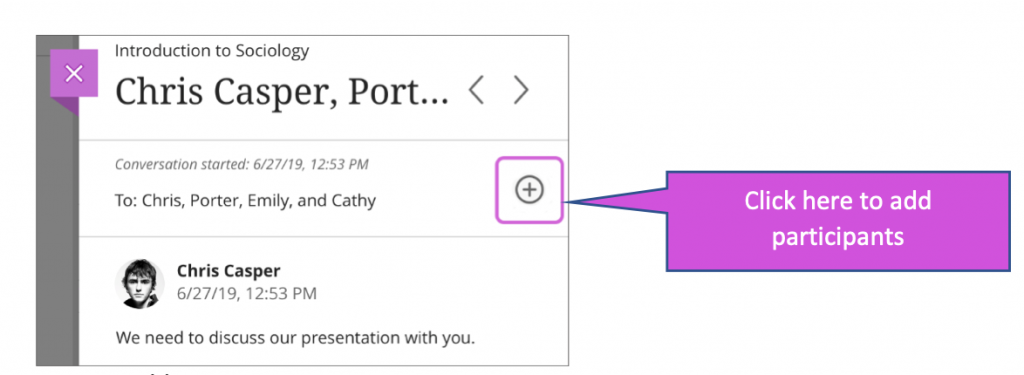
Fig. 17. Adding participants to messages
Send a message
When you select the new message icon on the Message page, the New Message panel opens.
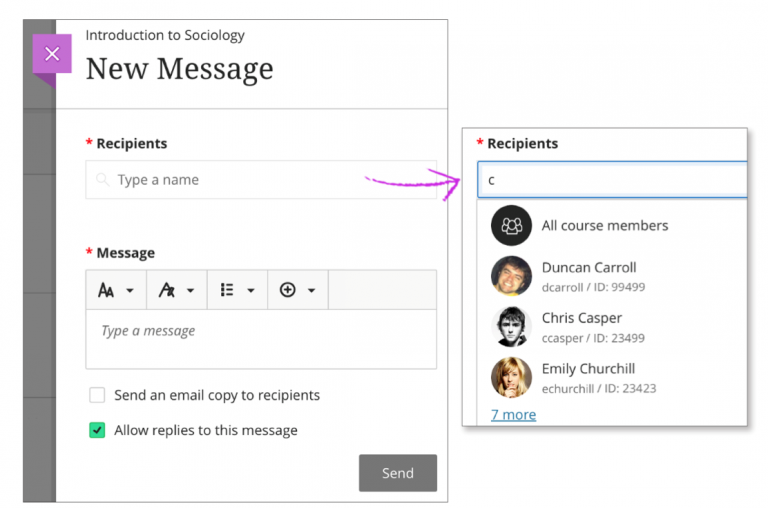
Fig. 4 Adding content using the “+” symbol
Fig. 18. Sending a new message
Start typing to add recipients. As you type, matching recipient names appear in a menu for easy selection (fig. 18). You can continue to add as many names as you want or send to the whole class.
Lead with the most important info.Messages don’t have titles. Recipients need to rely on the first part of your message as they choose what they read. Use the options in the editor to format your text.
*Quick Tip* To use your keyboard to jump to the editor toolbar, press ALT+F10. On a Mac, press Fn+ALT+F10. Use the arrow keys to select an option, such as a numbered list.
Send an email copy.You can send an email copy of a module message. Students might see, read, and act on important announcements and module messages when they receive a copy in their inboxes. Email copies are only delivered if recipients have valid email addresses in their Blackboard Learn profile.When you select this option, all recipients of the message receive an email copy.
*FIY* Recipients can view your message in their email inboxes but won’t be able to send an email to reply.
Allow or disallow replies.You may choose not to allow replies for messages you create. If you choose to send a message to the whole class, no one is allowed to reply by default.
When module messages are read-only for students, you’re alerted when you create a message. The Allow replies to this message check box applies to the role within a site allowed to reply and create messages, such as other instructors and teaching assistants.
Task: send a message
With the information above, send a message to your colleague
309 Regent Street, London W1B 2UW
General enquiries: +44 (0)20 7911 5000
Course enquiries: +44 (0)20 7915 5511
The University of Westminster is a charity and a company limited by guarantee.
Registration number: 977818 England