Staff Guide to online second marking in Blackboard
How to second mark if the assignment is created with Turnitin
1. Log in to Blackboard and go to the relevant module site.
2. Go to Control Panel > Tools > Turnitin UK Assignment.
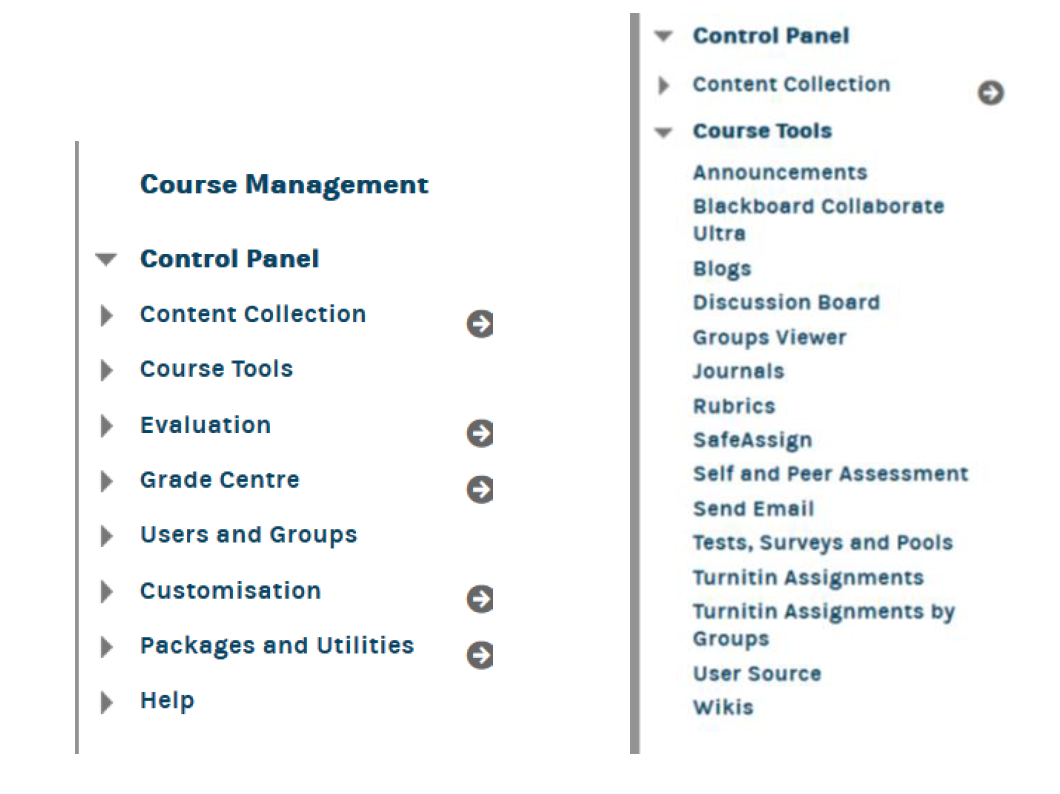
3. On the next page, click on the Assignment Title.
4. A page showing all anonymous submissions (or students and their submissions, if you are not using Anonymous marking) will show. Click on the assignment title for one of the submissions you are second marking. Student submissions deanonymise when all the marking has been completed unless there are any exceptions applied by your School. Please check the Assessment and Feedback Policy for more information.
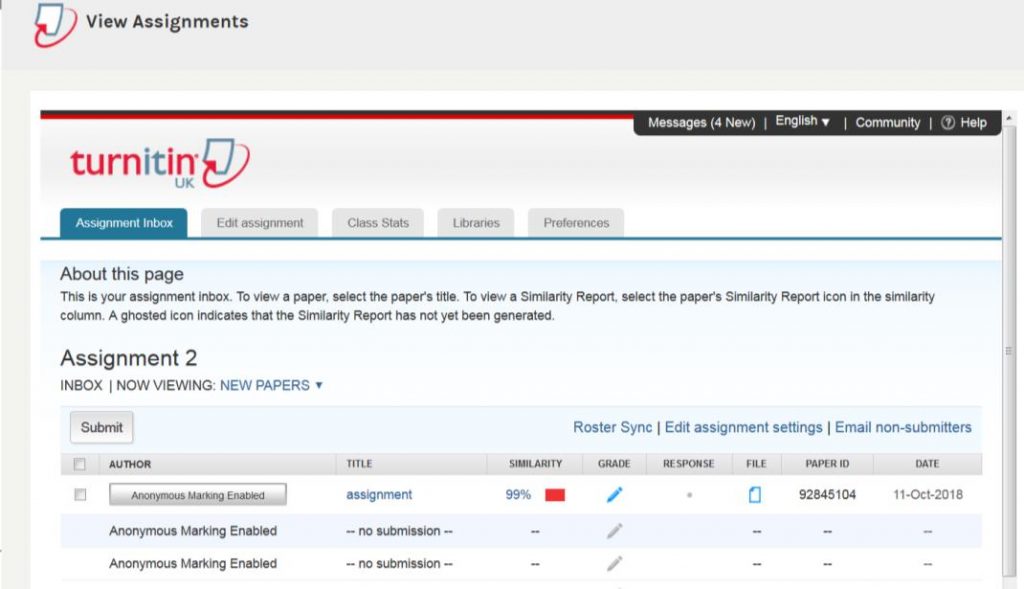
5. When you click on the first assignment to check, the assignment will open in a different window. Here, you can add comments to the document. Turnitin does not save the marker’s name, so you must ensure you add your initials when second marking.

The Turnitin Feedback Studio interface has minimised options for feedback/marking and the originality report. To view the originality report, click on the red icon and then select the options in the red boxes. To view the feedback options, click on the blue icon at the top and select each of the feedback options below:

The tick box will expand the inline comment options, the paper and pen icon will expand the general feedback and audio options, while the last icon will expand the rubric (if you are using one). Once you have selected the feedback and marking option, clicking anywhere inside of the body of the coursework to be marked will bring up an in-line comment box into which you can type a comment.

6. If using the general comments box, edit it and click within it. Scroll below any comments from the previous marker and add your initials, followed by your own comments. Make sure to save the edited general feedback, by clicking away from the box.
7. There may be a rubric enabled within Turnitin. If so, if you make any changes to the rubric, these will affect what the first marker has done. Please check with the first marker before making any changes to the rubric.
8. To add a mark, if one has not been assigned to the paper already, click on the ….
NOTE: You may have been given guidance to look at specific paper IDs when second marking to ensure consistency in marking workflows. In some cases, module leaders may decide instead to have groups set up. For instance, if there is a specific requirement to mark based on a seminar group. In the case of groups set up for marking, or second marking, there may be additional guidance given. The scope of this guide is to cover most generic scenarios.
How to second mark if the Assignment is created using Blackboard SafeAssignment
Blackboard Assignment incorporates Safeassignment within it and they are no longer separate. You do, however, need to enable ‘Safeassignment’ when setting a Blackboard assignment up, so that it will do the plagiarism checking.
NOTE: When Using the Blackboard assignment and you enable anonymous marking, we strongly recommend that the SafeAssign option is enabled. This will create a ‘table’ view listing all the assignments. This view is not available if the SafeAssign option is not ticked.
1. In the relevant Blackboard site go to the Control panel – Grade Centre – Full Grade Centre.
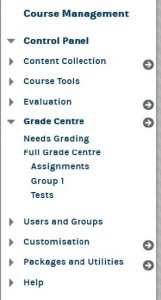
Note: As you are second marking, the anonymous assignments will no longer appear in the Needs Marking area, as they have already been marked once. You can access the assignments by going to the Full Grade Centre.
2. Within the Grade centre, locate the relevant assignment column. Hover your mouse over the assignment column chevron on the right and click on the arrow to expand the menu.
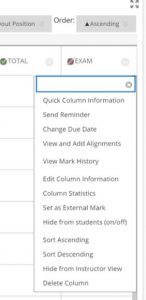
As the assignments are anonymous during the marking process, click on Grade Attempts, to see the first assignment. You can then move to the next assignment by using the arrow. This way of accessing the papers assumes that you can second mark any assignment. If you want to mark specific assignments, please check the steps shown here.
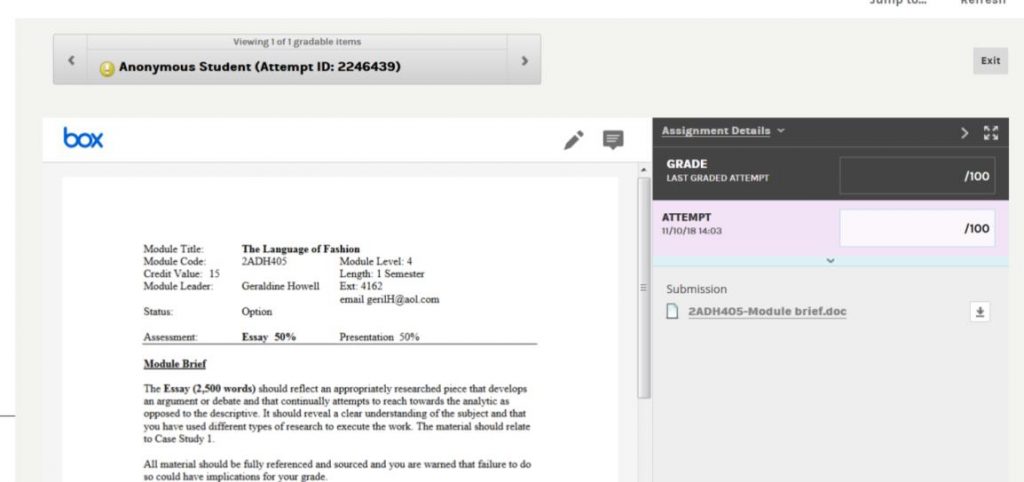
2. The assignment will open up. You can now add comments within the student submission, additional general feedback, and a mark.
3. When you add comments inline, each comment will be saved with your name automatically.
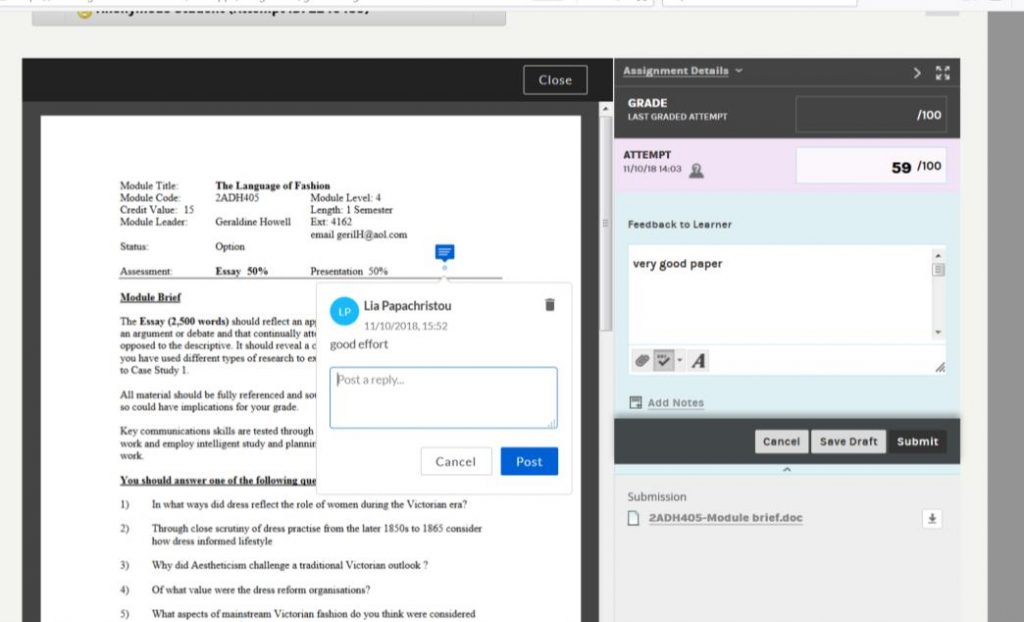
4. You can also add general feedback by expanding the menu to the right of the document.
5. Here you can add general feedback about the paper. Make sure you submit any changes you have made here (or save them as a draft). As there may be already some general feedback from a previous marker, you can add your initials next to your comment.

6. You can also click on this link to open the Rubric if one has been already assigned to this assignment title.
7. Just above the rubric is a link to the Safeassign report (plagiarism checking), that you can open and view.
8. When you open the Rubric, it will pop up in a separate window. Blackboard SafeAssignment has a very powerful feature within its Rubric. It allows for the marker to add more comments for each choice made within the rubric to allow for more personalised feedback, in addition to the standard rubric. Please save any changes made.

Second marking specific anonymous assignments
There may be a need to second mark specific papers, assigned to you by the moderator of the assessment process. If that is the case, then you need to access the Blackboard assignments in a different way:
1. Go to the Control Panel – Course tools and select the Safeassign toolNext click on Safeassign items on the main page.
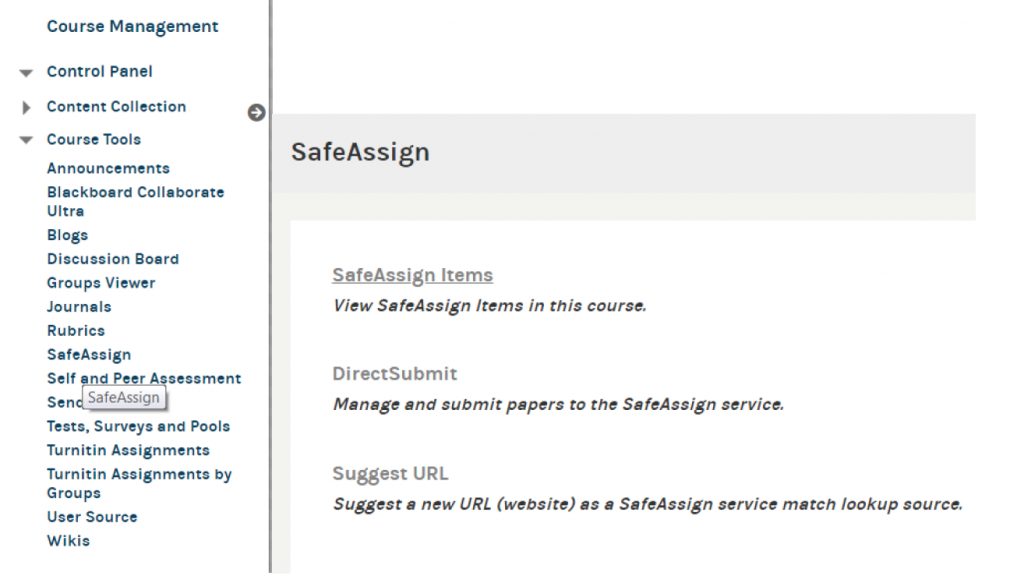
2. Next select the assignment title. The assignment title will show here if the Safeassign option was selected at the point of creation.

3. Once you clicked on the title, the submissions will show here.
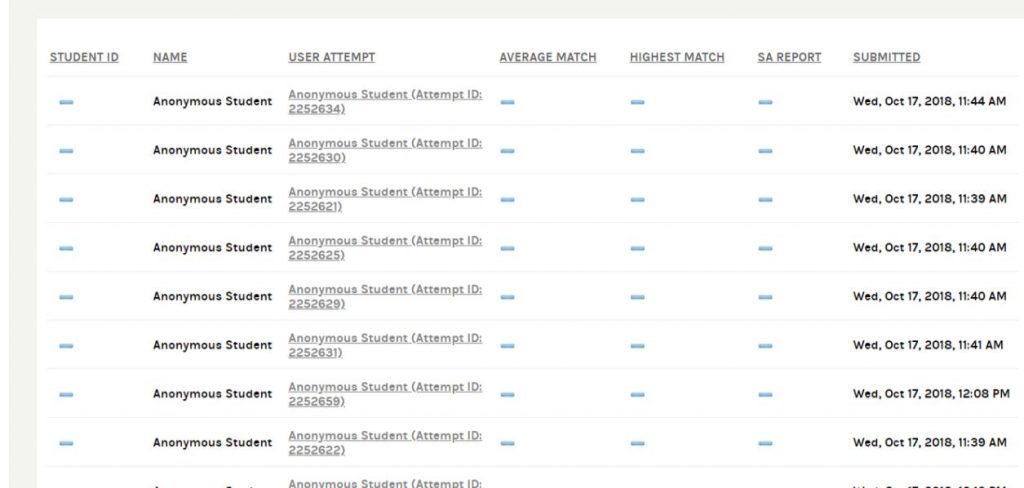
4. This view shows the papers, anonymised, but each paper shows its associated paper ID, which is unique to each student’s submission. If your moderator has given you specific IDs to mark, you can locate them here, and click on them to mark them.
5. In cases where you have more than one pages, it is useful to use the ‘Show all’ button at the bottom right, to see all the submissions on one page.

6. You may also want to sort by User Attempt column, so that it sorts by descending Paper ID number.
Delegated Grading in Blackboard
The Delegated Grading tool in Blackboard enables staff to assign student assignment submissions for marking electronically to colleagues on the Blackboard module.
This functionality is available when using the Blackboard Assignment – whether or not you enable the Safeassignment option – and can be set up as the Assignment Submission link is created.
Delegated Grading enables two or more staff members to provisionally grade and comment on assignment submissions with one staff member being able to ‘reconcile’ the final grade. The final grade is the only grade that students see in My Grades but students see all comments that may have been made by the delegated grader(s). It is possible to add ‘private’ notes between markers, but please take extra care when doing Updated on August 2019, Learning Innovation and Digital Engagement 10 so to ensure they are not accidentally added to the Feedback section, which will be visible to students.
Before using the Delegated Grading tool it is important to note that the staff member’s role on Blackboard drives the options that are available when delegating submissions to mark.
As Instructors on Blackboard, staff will be able to see each other’s comments and provisional grades, as well as being able to reconcile the final grade for release to the students.
However, by changing the staff member’s role to Teaching Assistant, it will not be possible for Teaching Assistants who are provisionally marking to see each other’s provisional grade and feedback. This also restricts the ability to reconcile grades to specific staff members.
Instructors can change roles within module sites, we would recommend that this is done after consulting with all staff marking the papers. It would be the module leader’s decision, in most cases as to whether the roles should be changed or not, for that module. Roles can be changed within each module separately.
Note: Where the staff role is changed to that of Teaching Assistant for the marking period, this will restrict the staff member’s ability to perform other tasks within Blackboard until the role is reverted to that of Instructor.
In all delegated grading scenarios there is a workflow that comprises of the following steps:
● Identify colleague’s Blackboard role and amend if/as necessary
● The Assignment Submission link is set up (with or without the Safeassignment option enabled)
● Colleagues are identified as being able to provisionally mark
● Students submit
● Two or more staff members provisionally mark the submission(s)
● One staff member reconciles the provisional marks and the final mark is released to the student in the My Grades view
Using the different roles that are available in Blackboard, the Instructor can cover the following three example scenarios:
● Allocating work to a colleague to grade, where both are able to see each other’s comments and input: both markers are Instructors and are able to reconcile the final grade and release this to the student
● Allocating work to a colleague to grade whilst ensuring that the delegated marker is unable to see the Instructor’s comments and input: The Instructor will be able to see the delegated markers provisional grade and only the Instructor can reconcile the final grade and release this to the student. To do this, please change the Delegated Grader’s role to Teaching Assistant. Updated on August 2019, Learning Innovation and Digital Engagement 11
● Important: The students will not be able to see their final grades until the Instructor reconciles the grades. There is an option to ‘bulk reconcile’ grades to save time.
● Double-blind marking where neither party are able to see each other’s comments and input during grading. This involves changing all/both markers roles to Teaching Assistant and reverting to Instructor for reconciling.
Setting up Delegated Marking
First, you need to create the Assignment Submission link, by going to the relevant area on the module and clicking on Assessments and then Assignment.

Enter a name, description, due date and points value as normal. Click on Grading Options. Here you can enable Anonymous Marking as well.

Place a tick against Enable Delegated Marking and then the view will change to:

The Marker column displays all of the staff members to whom submissions can be delegated for grading.
By default, the Submissions to Grade column displays All Submissions for all staff who are able to perform the role of a delegated grader.
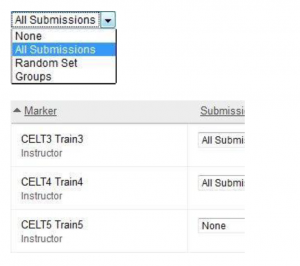
By clicking the drop-down arrow the following options become available:
● None – this allocates no submissions for the staff member to mark and this staff member will not be included in the scenario
● All Submissions – the staff member will be able to provisionally mark all submissions made to this Assignment Submission link
● Random Set – you will be prompted for a numerical value and once entered a random set of submissions not exceeding the specified numerical value will be allocated to the staff member for delegated grading
● Groups – where the group’s function is being used, selecting Groups here will offer the Instructor the option to allocate submissions for delegated grading by the group.
In this example, it is assumed that there is a small cohort of students and one of the staff members will be set to All Submissions whilst the other staff Updated on August 2019, Learning Innovation and Digital Engagement 13 members will be set to None. The resultant set-up is:
● All three accounts shown are Instructors but only CELT3 Train3 and CELT4 Train4 will be allocated work to grade. However, other Instructors could override this by accessing submissions directly in the Grade Centre and marking them.
Important: It is recommended that when using Delegated Grading in this way that all Instructors are made aware of the exact set-up. The View Settings column enables the Instructor to decide whether the delegated grader(s) can see the Instructor’s comments and provisional grade. This option is greyed out and cannot be changed. This is because the delegated grader is also an Instructor. With the Delegated Grading options set, click the Submit button.
Once the students have submitted, navigate to Control Panel>Grade Centre>Needs Marking

In the list, select the item to be provisionally marked by clicking the link. This list appears in reverse chronological order.![]()
Using the grading tools, grade the submission as normal and click Submit
Note: Both graders should perform the steps above to ensure that there are two provisional grades and sets of comments for each submission.
At any stage, as both of the graders are Instructors, the graders can enter the Grade Centre and see each other’s comments and provisional grades during the marking period.

When in the Grade Centre, select the down arrow next to any of the attempts that have been provisionally marked and select Attempt.

The attempt will open and all feedback and provisional grades are visible.
Note: This view is only available if both graders are Instructors.
Note: The remaining steps are to be completed by the Instructor who is responsible for reconciling and releasing the grade to the student.
Navigate to Control Panel>Grade Centre>Full Grade Centre

Attempts that require grades to be reconciled will be marked with the Reconcile Grades icon.
Click on the down arrow next to the attempt and select View Grade Details
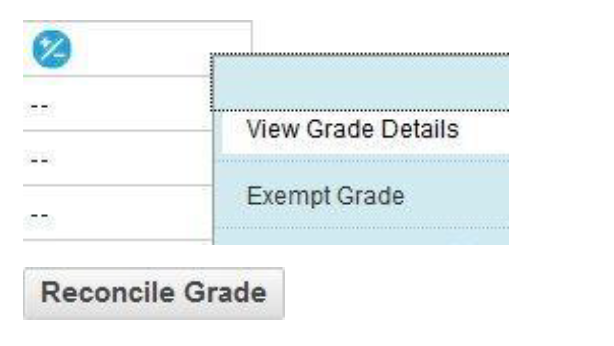
Click on Reconcile Grade

The Reconcile Grade view enables the Instructor who is responsible for reconciling grades to determine the Final Grade.
Click on the Reconcile Grade icon in the Final Grade column and select one of the options or type a value in the space provided.

The Final Grade along with the feedback generated by both markers will be available for students in the My Grades view.
The students will not be able to see the provisional grades.
Note: The Reconcile Grade view can also be used before all provisional grades are submitted to monitor the progress of the delegated grader(s).
Click on the Show Grader Progress button to view a representation of progress at any time during the marking period.

If you need any further advice on this feature, please contact the Learning Technology Specialist based on your site.
Last updated January/2022