Accessibility Complete Guide
Making Microsoft Office files more accessible and suitable for use by Blackboard Ally
The university has invested in a system called Blackboard Ally, which integrates seamlessly into Blackboard. Ally provides students with more accessible original content, which means that they can choose formats that work best for them (e.g. HTML for improved reading on mobile phones, electronic braille for the visually impaired, and audio for learning on the go). Ally automatically scans your original content and, as well as making the alternative formats automatically accessible, suggests a series of steps to make the source document itself more accessible. In summary ALLY
• Generates alternative formats for students to download
• Provides accessibility scores
• Provides feedback on how to improve the accessibility score of original files
For Blackboard ALLY to be able to be effective in providing students with alternative formats of your file, it is essential that you follow some basic accessibility rules when you prepare both Microsoft Word document files and Microsoft PowerPoint presentation files, before you upload them to Blackboard.
For Microsoft Word and PowerPoint content to be more accessible, we recommend that you use the (Microsoft) Accessibility Checker before uploading a document or presentation to your course on Blackboard.
The guide below provides you with information on how to create more accessible learning materials to enhance student learning Accessible means that the materials can be accessed by students with disabilities and specific learning difficulties, such as dyslexia. In addition, as indicated above, the more accessible a file is in the first place, the more usable will be the alternative formats that ALLY can generate for students.
This guide will also help you produce better documents and/or presentations for all users and will contribute to the successful conversion of documents to PDF files.
Making these small but important changes will make your materials clearer and more easily understandable, which will be of benefit all your students, not just those with disabilities.
Please see the table of contents below for Recommendations and How To guides.
1. Best practices for making Word documents accessible
The following information includes key best practices for creating Word documents that area accessible to people with disabilities and specific learning difficulties.
1.1. Add alt text to images
Alt text helps people who can’t see the screen to understand what’s important in images and other visuals. Add alt text to images, such as pictures, screenshots and videos, so that screen readers can read the text to describe the image to someone who cannot see it.
To add alt text to an image, do the following:
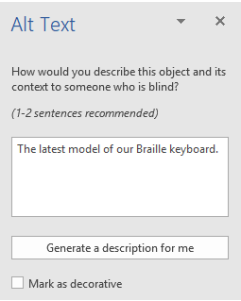
1. Right-click an image and select Edit Alt Text.
The Alt Text pane opens on the right side of the document body.
2. Type 1 to 2 sentences to describe the image content and add the University of Westminster site link.
1.2. Add alt text to shapes, SmartArt graphics and charts
Alt text helps people who can’t see the screen to understand what’s important in images and other visuals. Add alt text to shapes, SmartArt graphics and charts, so that screen readers can read the text to describe the shape, graphic or chart to someone who cannot see it.
To add alt text to shapes, SmartArt graphics or charts, do the following:
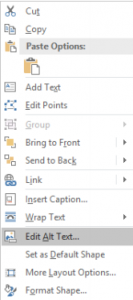
1. Right-click a shape or SmartArt graphic and select Edit Alt Text.
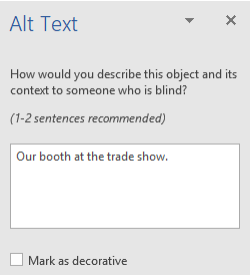
The Alt Text pane opens on the right side of the document body.
Tip: You have to right-click somewhere inside the frame that surrounds the entire shape or SmartArt graphic, not inside one of its parts.
2. Type one to two sentences to describe the shape or SmartArt graphic and its context to someone who cannot see it.
1.3. How to add a hyperlink to the Alt Text box
People who use screen readers sometimes scan a list of links. A links should convey clear and accurate information about its destination.
To add a hyperlink to the Alt Text box, do the following:
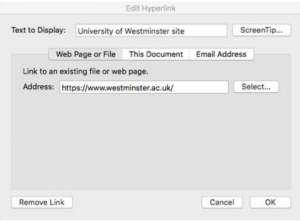
1. Right-click the selected text which you will be the hyperlink and click Link.
2. In the Insert Hyperlink dialog box, select the Existing File or Web Page tab (the previously selected text will be displayed in the Text to display box) and add the destination URL in the Address box.
3. Click OK to confirm and close the dialog box.
1.4. Use an accessible text format
To reach all your students, you need to make effective use of accessible text formats.
Some things to consider when choosing text for documents are:
1. Adding an underline to colour-coded hyperlink text, which can help people who are colour blind know that the text is linked, even if they can’t see the colour.
2. Add shapes if necessary to indicate status. For example, add a checkmark symbol ✔ to indicate a ‘pass’ and an uppercase X to indicate a ‘fail’
1.5. Use accessible text colour
If your document has a high level of contrast between text and background, more people can see and use the content.
Some things to consider when choosing text colours for documents are:
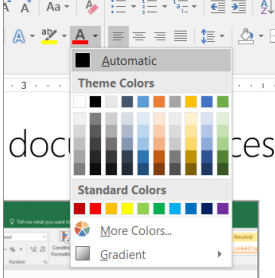
1.Ensure that text displays well by using the Automatic setting for font colours. Select your text, and then select Home > Font Colour > Automatic.
2. Use the Accessibility Checker, to analyse the document and find insufficient colour contrast. The tool now checks the documents for text colour against page colour, table cell backgrounds, highlight, textbox fill colour, paragraph shading, shape and SmartArt fills, headers and footers, and links.
1.6. Use built-in headings and styles
To preserve tab order and to make it easier for screen readers to read your documents, use a logical heading order and the built-in formatting tools.
To apply a built-in heading style, do the following:
1. Select the heading text.
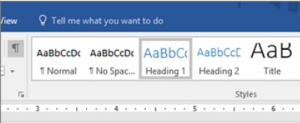
2. On the Home tab, in the Styles group, select a heading style, for example, Heading 1 or Heading 2.
1.7. Use table headers
Tables should always use a simple structure and specify column header information. Screen readers keep track of their location in a table by counting table cells, so cells should not be split or merged. Screen readers also use header information to identify rows and columns.
To create a table header within a table, do the following:
1. Position the cursor anywhere in a table.
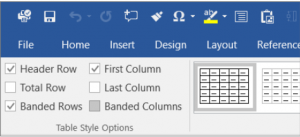
2. On the Table Tools Design tab, in the Table Style Options group, select the Header Row check box.
3. Type the column headings.
Tip: To ensure that tables don’t contain split cells, merged cells, or nested tables, use the Accessibility Checker. You can also visually scan your tables to check that they don’t have any completely blank rows or columns.
2. Best practices for making PowerPoint presentations accessible
The following information includes key best practices for creating PowerPoint presentations that are accessible to people with disabilities and specific learning difficulties.
1.1. Add alt text to images
Alt text helps people who can’t see the screen to understand what’s important in images and other visuals. Add alt text to images, such as pictures, screenshots and videos, so that screen readers can read the text to describe the image to someone who cannot see it.
To add alt text to an image, do the following:
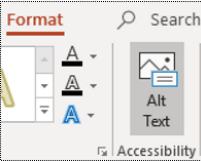
1. Right-click an image and select Edit Alt Text.
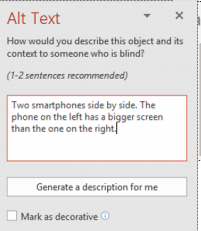
The Alt Text pane opens on the right side of the sheet.

2. Type 1 to 2 sentences to describe the image content and add the University of Westminster site site link.
2.2. Add alt text to shapes, SmartArt graphics and charts
Alt text helps people who can’t see the screen to understand what’s important in images and other visuals. Add alt text to shapes, SmartArt graphics and charts, so that screen readers can read the text to describe the shape, graphic or chart to someone who cannot see it.
To add alt text to shapes, SmartArt graphics or charts, do the following:
1. Right-click a shape or SmartArt graphic and select Edit Alt Text.
The Alt Text pane opens on the right side of the document body.
Tip: You have to right-click somewhere inside the frame that surrounds the entire shape or SmartArt graphic, not inside one of its parts.

2. Type one to two sentences to describe the shape or SmartArt graphic and its context to someone who cannot see it.
Tip: You can also select Generate a description for me to have Microsoft’s cloud-powered intelligent services create a description for you. This takes a moment, after which you see the result in the text entry field. Remember to delete any comments PowerPoint automatically. Please note that this feature is currently only available in Office 365.

2.3. Review or edit automatically generated alt texts in photos
PowerPoint for Windows in Office 365 automatically generates alt texts for photos by using intelligent services in the cloud. You can review and edit the auto generated alt texts.
1. Right-click an image, and then select Edit Alt Text (opens the Alt Text pane).
2. In the Alt Text pane, review the description in the text box.
3. Then choose from one of the actions below:
a. To accept the suggested text, close the Alt Text pane and return to the PowerPoint slide.
b. To change the suggested alt text, type your preferred text in the box. Once you’re done, close the Alt Text pane and return to the PowerPoint slide.
2.4. Set the reading order of slide contents
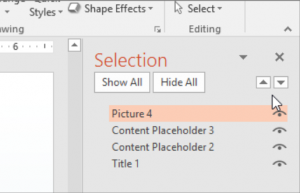
When someone who can see reads a slide, they usually read elements on the slides, such as text or a picture, in the order the elements appear on the slide. In contrast, a screen reader reads the elements of a slide in the order they were added to the slide, which might be very different from the order in which things appear. To make sure everyone reads the contents in the order you intend, it’s important to check the reading order.
Use the Selection pane to set the order in which the screen readers read the slide contents. The Selection pane lists the objects on the slide in reverse order. When the screen reader reads this slide, it reads the objects in the reverse order listed in the Selection pane.
To set the reading order of slide contents, do the following:
1. On the Home tab, in the Drawing group, select Arrange.
2. In the Arrange menu, select Selection Pane.
3. In the Selection pane, to change the reading order, do one of the following:
a. Drag and drop items to the new location.
b. Select the item and then select the Up-arrow button (Bring Forward) or Down-arrow button (Send Backward).
2.5. Add hyperlink text and ScreenTips
People who use screen readers sometimes scan a list of links. Links should convey clear and accurate information about the destination. For example, instead of linking to the text with the words Click here, include the full title of the destination page. You can even use the URL of the page if it’s short and descriptive, for example, www.westminster.ac.uk.
To add hyperlink text and ScreenTips, do the following:
1. Select the text to which you want to add the hyperlink, and then right-click.
2. Select Link. The text you selected displays in the Text to display box. This is the hyperlink text.
3. If necessary, change the hyperlink text.
4. In the Address box, enter the URL address for the hyperlink.
5. Select the ScreenTip button and, in the ScreenTip text box, type a ScreenTip.
6. To apply the changes, select OK > OK.
Tip: ScreenTips are small windows that display descriptive text when you rest the pointer on a command or control.
2.6. Use accessible text colour
Use strong contrast between text and background, so people with low vision can see and use the content. Use dark text on a white or off-white background or reverse it and use white text on a dark background. White and black schemes also make it easier for people who are colour-blind to distinguish text and shapes.
Here are some ideas to consider:
1. Use the Accessibility Checker to analyse the slides and find insufficient colour contrast. The checker analyses the text in the slides against the following elements:
✓ Page colour
✓ Cell backgrounds
✓ Highlights
✓ Text box fill
✓ Paragraph shading
✓ SmartArt fills
✓ Headers and footers
✓ Links
2.7. Use unique slide titles
People who are blind, have low vision, or a reading disability rely on slide titles to navigate. For example, by skimming or using a screen reader, they can quickly scan through a list of slide titles and go right to the slide they want.
To use slide titles, do the following:
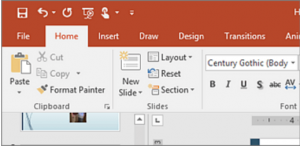
1. To restore all placeholders for the selected slide, on the Home tab, in the Slides group, select Reset.
2. On the slide, type a unique and descriptive title.
2.8. Use table headers
Tables should always use a simple structure and specify column header information. Screen readers keep track of their location in a table by counting table cells, so cells should not be split or merged. Screen readers also use header information to identify rows and columns.
To create a table header within a table, do the following:
1. Position the cursor anywhere in a table.
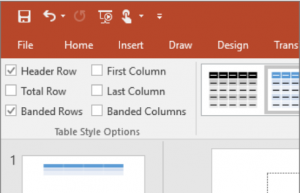
2. Select the Design tab.
3. In the Table Style Options, select the Header Row check box.
4. In the table, type the column headings.
2.9. Use a larger font size and sufficient white space
People who have dyslexia describe seeing text ‘swim together’ on a page (the compressing of one line of text into the line below). They often see text merge or distort.
For people who have dyslexia or have impaired vision, reduce the reading load. For example, they may benefit from familiar sans serif fonts, such as Arial, Calibri or Verdana. Avoid using all capital letters and excessive italics or underlines. Include ample white space between sentences and paragraphs.
In addition, when possible, consider using a larger font size (18pt or larger).
For more information on accessible slide design and formatting text for improving accessibility, please follow the links below (information provided by Microsoft):
1.Use an accessible slide design
2.Format text for accessibility
Tip: To ensure that tables don’t contain split cells, merged cells, or nested tables, use the Accessibility Checker. You can also visually scan your tables to check that they don’t have any completely blank rows or columns.
3. Make videos accessible to visually impaired and hearing-impaired users
3.1. Use audio tracks, captions and subtitles in videos
PowerPoint supports the playback of video with multiple audio tracks. It also supports closed captions and subtitles that are embedded in video files.
Currently, only PowerPoint for Windows (PowerPoint for office 365, PowerPoint 2019, PowerPoint 2016) supports insertion and playback of closed captions or subtitles that are stored in files separate from the video. For all other editions of PowerPoint (such as PowerPoint for macOS or any of the mobile editions), closed captions or subtitles must be encoded into the video before the video is inserted into PowerPoint.
Please note that closed audio tracks, captions and subtitles are not preserved when you use the Compress Media or Optimize Media Compatibility features. In addition, when a presentation is converted into a video, any audio tracks, closed captions and subtitles in the embedded video are not included in saved video file.
However, when you use the Save Media as command on a selected video, multiple audio tracks, closed captions and subtitles in the video are preserved in the saved video file.
To make your PowerPoint presentations with videos accessible, please ensure the following:
✓ Videos include an audio track with video descriptions, if needed, for users that are blind or visually impaired.
✓ Videos that include dialogue also include closed captions, in-band closed captions, open captions, or subtitles in a supported format for users that are deaf or hard of hearing.
3.2. Create Closed captions
Prepare a text-based caption file with a .vtt filename extension before adding captions. For instructions on how to create the caption file, see Create closed captions for a video.
3.3. Add closed captions to a video
You can add captions to presentations that you’ve recorded with video narration, screen recordings, and any other video (except online videos) that you insert into PowerPoint. Currently, adding captions to an audio-only recording isn’t supported.
1. In PowerPoint, in the Normal view, open the slide that has the video that you want to add captions to.
2. Select the video on the slide.
3. On the Playback tab, click the Insert Captions button, and then select Insert Captions.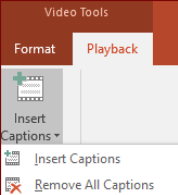
4.In the Insert Captions dialog, browse to your caption file. Select the file and then click Insert.
5. If you need to add another caption file, just repeat the process.
6. Play the video and check that the captions appear correctly.
3.4. Remove closed captions from a video
If you need to edit a closed caption file that is inserted in a video in PowerPoint, you can first remove the file, modify it, and then add it back to the video. Before removing the file from the PowerPoint video, make sure you have the original copy of the closed caption file stored on your PC.
If you have added more than one caption file to a video, the following process removes all caption files assigned to the video.
1. In PowerPoint, in the Normal view, open the slide that has the video containing the captions.
2. Select the video on the slide.
3. On the Playback tab, click the Insert Captions button, and then select Remove All Captions.

Things to note:
✓ Closed captions typically also describe audio cues, such as music or sound effects that occur off-screen.
✓ Subtitles typically contain a transcription (or translation) of the dialogue.
Please click on this link for more information relating to making videos accessible.
4. Improve accessibility with the Accessibility Checker
For Microsoft Word and Microsoft PowerPoint content to be more accessible, we recommend that you use the (Microsoft) Accessibility Checker before uploading a document to your course on Blackboard.
Please make sure to run the Accessibility Checker on your presentations to make sure your Microsoft Office content is easy for people of all abilities to read and edit.
4.1. How to use the Microsoft Accessibility Checker
1. Once you have opened the desired document/presentation created in Word or PowerPoint, on the ribbon, select the Review tab.
2. Select Check Accessibility.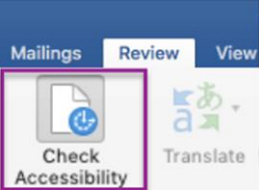
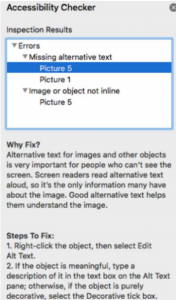
3. Review your results. You’ll see a list of errors, warnings, and tips with how-to-fix recommendations for each, should there be any.
4. Select one of the items from the Inspection Results box (in this case the Errors list) and check the Steps to Fix text.
staff_accmpg_11_20